
The Power Platform Center of Excellence (CoE) Kit is a tool that helps increase the efficiency and the management of your business. One of its uses is the tracking of data consumption in Dataverse instances and alerts when it gets too close to the maximal capacity chosen (80%).
Setting up the capacity alerting and reporting relies on the Core Components of the Power Platform CoE. We will need to set it up in the first place, before enabling this feature. The Power BI dashboards will also prove themselves useful in the monitoring of capacity usage.
Setting up the core components of the CoE
The Power Platform CoE kit is a solution you can install in the instance you’ll choose to dedicate to the monitoring of your tenant. Per Microsoft documentation, you’ll need the following identity:
- Microsoft Power Platform service admin, global tenant admin, or Dynamics 365 service admin.
- Power Apps Per User license (non-trial) and Microsoft 365 license.
- Power Automate Per User or Per Flow license (non-trial).
- The identity must be email-enabled. (the CoE sends emails from the account you installed the kit with)
- If you’d like to collect telemetry information, such as app launches and unique users per app, you must be granted access to the Audit Log and work with a Global Admin who has access to Microsoft 365 audit log to complete the setup.
These roles and licenses must be available to this user continuously; if admin access is granted only temporarily via Privileged Identity Management (PIM), this won’t be sufficient to run the CoE Starter Kit.
Multi-factor authentication can be used for the account setting up the CoE Starter Kit, if MaxAgeMultiFactor is set to Until-Revoked instead of a fixed time. Learn more: Conditional access and multi-factor authentication in Power Automate.
For this example, we will assume the environment is in the commercial cloud. Indeed, GCC, GCC High or DoD (Government Community Cloud, Government Community Cloud High and Department of Defense environments are compliant with relevant certifications and accreditation to meet the requirements of US government and Department of Defense amongst others) environments URLs may differ from the ones provided in the following article.
Before starting the operations, make sure as well that you have the following information, as they will be needed as environment variables upon import.
- Admin email: the email used to communicate with your admins
- Individual Admin: the email used for communications in the starter kit (cannot be a group email)
- Power Platform Maker Microsoft 365 Group: the ID of a Microsoft 365 group containing Power Platform makers. You’ll find the ID on the azure portal in the groups tab
- Graph URL Environment Variable : https://graph.microsoft.com/
- PowerApp Maker environment variable: https://make.powerapps.com/
- PowerApp Player environment variable: https://apps.powerapps.com/
- Power Automate environment variable: https://make.powerautomate.com/manage/environments/
- TenantID: the Azure tenant ID, which you may find on the Azure Portal, in the Azure Active Directory tab
Go to the Power Platform Admin Center and select your instance. If you create it, select the production type, and choose to have a database (however, the creation of a dataset is not needed).
In the meantime, you can download the CoE starter kit, which you may find here: aka.ms/CoEStarterKitDownload.
Once downloaded, unzip it and you’ll find multiple files. As we will be working on a Dataverse instance (as opposed to a Dataverse for Teams instance), the file CenterofExcellenceCoreComponents_XXX_managed.zip is the solution we will use for import.
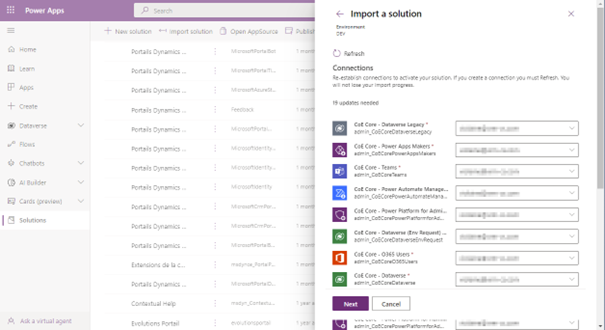
When the instance is available, head to make.powerapps.com into the appropriate instance and navigate to the Solutions zone. Here, you’ll be able to import the solution from the folder you unzipped earlier.

Upon importing, you’ll be prompted to create the necessary connections if they don’t exist already. This is because the CoE solution contains a vast variety of Cloud Flows for monitoring. So go ahead and connect to all of those using an account with admin access.
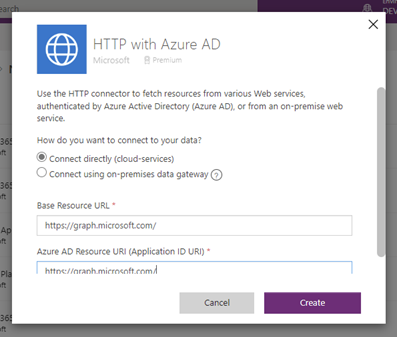
NB: for the HTTP with Azure AD, you’ll be asked to enter the Base Resource URL and the Azure AD Resource URI (Application ID URI). The URL to enter is https://graph.microsoft.com/
Once all the Connections are created and you progress to the next step, the Environment Variables need to be filled. You may have empty fields without a name or description.
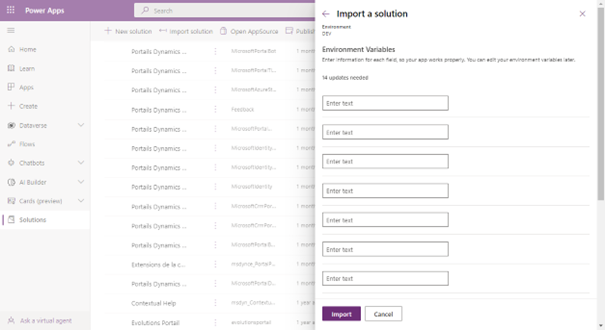
If that is the case, no worries, you may progress to the next step and fill them out afterwards.
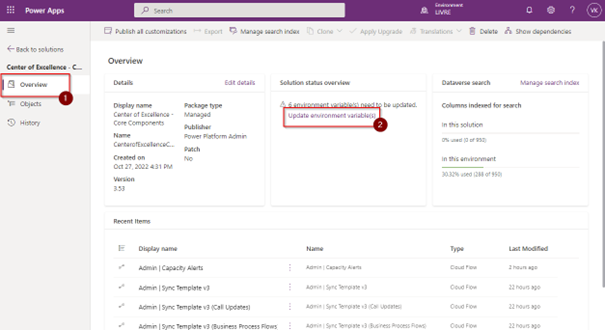
The import will take several minutes, once it is completed, open the newly created solution: Center of Excellence – Core Components.
If you have not been able to fill out the environment variables previously, head over to the overview tab and there, update environment variable(s).
Afterwards, head over to the Objects tab and select the Cloud Flows:
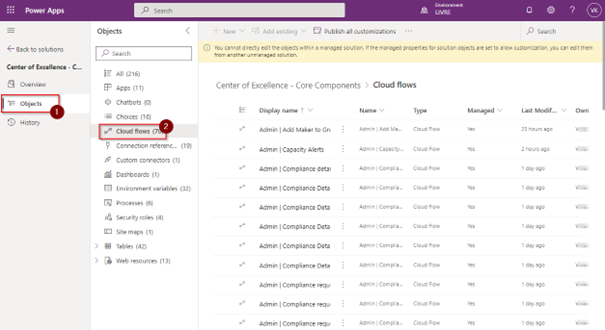
As there are child and parent flows, as well as to optimize the activation of the flows, the following order of activation is recommended:
- HELPER – Send Email
- HELPER – Maker Check
- HELPER – CloudFlowOperations
- HELPER – CanvasAppOperations
- HELPER – ObjectOperations
- CLEANUP HELPER – Check Deleted (Ai Models)
- CLEANUP HELPER – Check Deleted (Business Process Flows)
- CLEANUP HELPER – Check Deleted (Canvas Apps)
- CLEANUP HELPER – Check Deleted (Cloud Flows)
- CLEANUP HELPER – Check Deleted (Custom Connectors)
- CLEANUP HELPER – Check Deleted (Model Driven Apps)
- CLEANUP HELPER – Check Deleted (PVA)
- CLEANUP HELPER – Check Deleted (Solutions)
- CLEANUP HELPER – Power Apps User Shared With
- Admin | Sync Template v3 CoE Solution Metadata
- Admin | Sync Template v3 Configure Emails
- Admin | Sync Template v3 (Connectors)
- Admin | Add Maker to Group
- Admin | Excuse Support Envts from Governance Flows
- Command Center App > Get M365 Service Messages
- Command Center App > Initially Populate Bookmarks
- Command Center App > Set CoE Flows State
- Command Center App > Get CoE Flows
- DLP Editor > Parse impacted resources into CSV
At that point, stop and ensure that the flows run correctly by triggering them one by one:
- Admin | Sync Template v3 CoE Solution Metadata
- Admin | Sync Template v3 Configure Emails
- Admin | Sync Template v3 (Connectors)
You may do so on the Power Automate website: https://make.powerautomate.com/. They will take some time to execute, and once they have succeeded, keep turning on the flows as follows:
- Admin | Sync Template v3 (Ai Models)
- Admin | Sync Template v3 (Apps)
- Admin | Sync Template v3 (Business Process Flows)
- Admin | Sync Template v3 (Call Updates)
- Admin | Sync Template v3 (Connection Identities)
- Admin | Sync Template v3 (Custom Connectors)
- Admin | Sync Template v3 (Desktop Flow – Runs)
- Admin | Sync Template v3 (Desktop flows)
- Admin | Sync Template v3 (Environment Properties)
- (optional) Admin | Sync Template v3 (Flow Action Details)
- Admin | Sync Template v3 (Flows)
- Admin | Sync Template v3 (Model Driven Apps)
- Admin | Sync Template v3 (Portals)
- Admin | Sync Template v3 (PVA)
- Admin | Sync Template v3 (Solutions)
- Admin | Sync Template v3 (Sync Flow Errors)
- Admin | Sync Template v3
- CLEANUP – Admin | Sync Template v3 (Check Deleted)
- CLEANUP – Admin | Sync Template v3 (Connection Status)
- CLEANUP – Admin | Sync Template v3 (Delete Bad Data)
- CLEANUP – Admin | Sync Template v3 (Orphaned Makers)
- CLEANUP – Admin | Sync Template v3 (Power Apps User Shared With)
Set an Approved Capacity consumption per data type and environment
To get alerts, activate the flow “Admin | Capacity Alert”. Once all flows are activated, head over to the Apps tab of Power Apps, and you may notice some new apps. The Power Platform Admin View is the one we will need to set the maximal data consumption in instances.
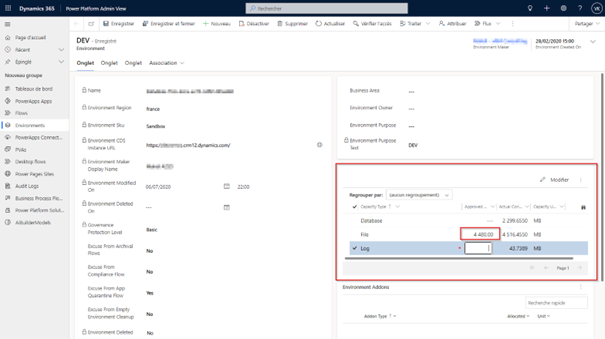
To set an Approved capacity, open the Environment entity and, once you open the relevant record, you’ll notice a sub-grid displaying the consumption per capacity type. Fill in your desired approved capacity in the corresponding column.
For example, in the following image, the approved capacity of the DEV environment for the file data type is 4480, which will cause an alert as the actual consumption (4513.811) is greater than the approved capacity. We may also choose approved capacity for Database and Log type in order to get alerts on those as well.
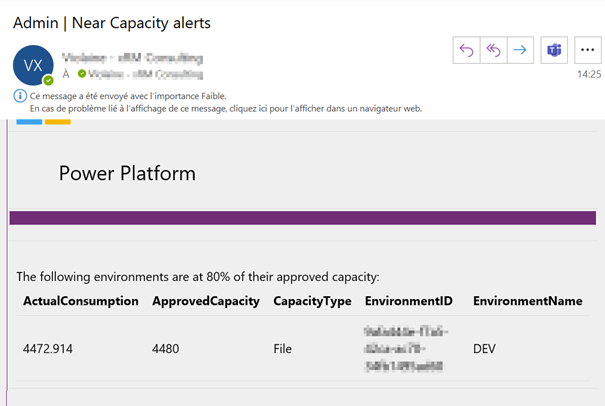
If we had an actual consumption lower than our approved consumption, the alerts would not be triggered until 80% of the approved capacity, which is to say 3584 MB. Therefore, you’ll need to calculate the lower cap of data consumption for which you’ll need an alert to be 80% under your approved capacity.
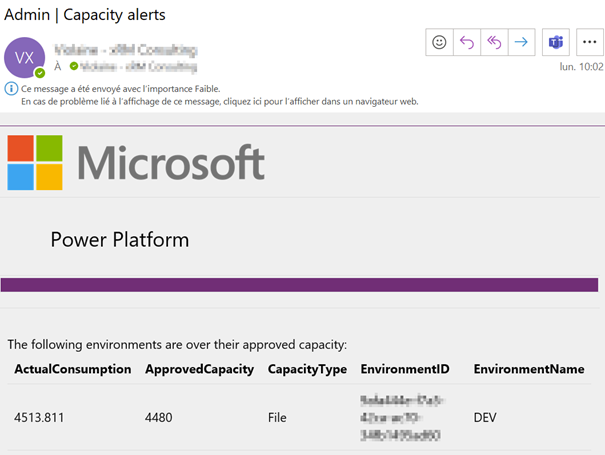
On Mondays, the admins will receive emails containing the relevant information on environment closing in or exceeding their approved capacity. Near capacity alerts means that the actual data consumption is 80% or more of the approved capacity, while capacity alerts concern the data consumption over the 100% cap.
Le seul moyen, à ma connaissance, de modifier le 80% et la fréquence, c’est de modifier le Flow fourni dans le kit CoE. Doit-on considérer que c’est une action supportée par MS ?
If you need the information at a specific time, you may run the Power Automate “Admin | Capacity Alert” and it’ll send the corresponding result to the admin almost instantly.
For further monitoring, in the folder unzipped from the starter kit, you’ll be able to find several Power BI reports. The Production_CoEDashboard_MMMYY.pbit contains many tabs that’ll help you see everything briefly. The “Environment Capacity” tab will let you see the type of data consumption as week as its value in MB.


[…] too close to the maximal capacity chosen (80%). Setting up the capacity alerting and reporting … Continue reading Create weekly alerts on data consumption in your Dataverse environments. Read Complete Post and Comments $(document).ready(function(){ if(''!='') { $(".post […]
[…] too close to the maximal capacity chosen (80%). Setting up the capacity alerting and reporting … Continue reading Create weekly alerts on data consumption in your Dataverse environments. Read Complete Post and Comments SBX – Two Col […]